
Quicken has an in-product guide to get you started using Quicken. If you haven't already see it, or want to return to it, open Quicken and go to the View menu, then select Show Quicken Setup.
We have posted many helpful videos on YouTube as well. You can start with An Overview of Quicken.
You may also find these slide shows useful:
Contacting Support
This is a guide to using the product. If you are having issues setting up your Quicken or your Quicken subscription, go to the Quicken Support Page.
The information for phone and chat support is at the bottom of the Quicken Support Page.
Key information to get you started
The sections below will help you with setup and understanding key concepts.
Add your Accounts
This page is a general guide to adding accounts. If you are having issues/errors adding an account you should visit the Quicken Support Page or contact Quicken Support directly.
To use Quicken you must start by adding your financial accounts. It's easy to add the accounts you want to track in Quicken. The more accounts you add the more closely Quicken reflects your true financial situation, which can assist you in short- and long-term financial planning.
Add an online account
With online accounts, you download your transactions directly from the financial institution. If you do prefer to enter your transactions manually, see Add an offline spending account below.
-
Select the Add Account

You can also add a new account by selecting Tools → Add Account from the top menu. -
Start typing the name of your financial institution, such as your bank or credit card provider. Quicken will filter the results based on what you type. When you see your financial institution in the panel below, select it and click Next.
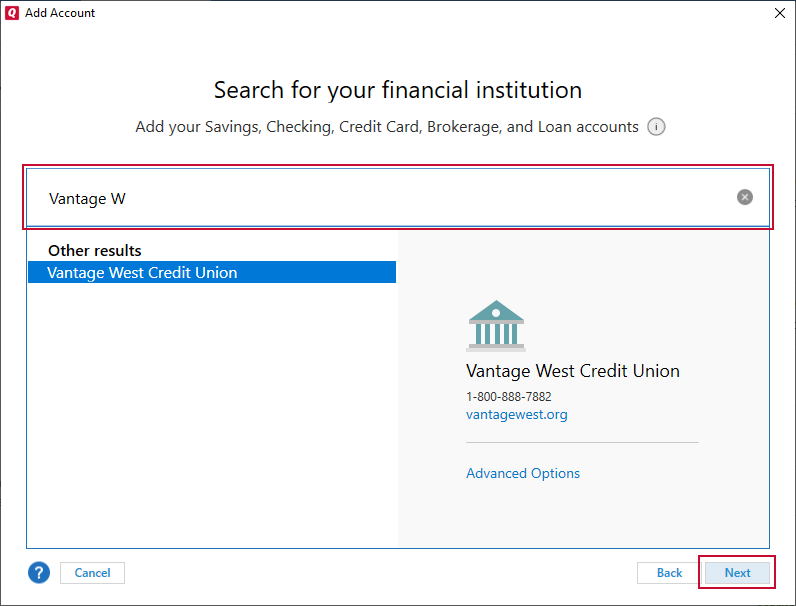
For online accounts, Quicken finds accounts based on the financial institution. This way, if you have multiple accounts at the same bank, you can add them all at once. You will have a chance to select the type of account later.
-
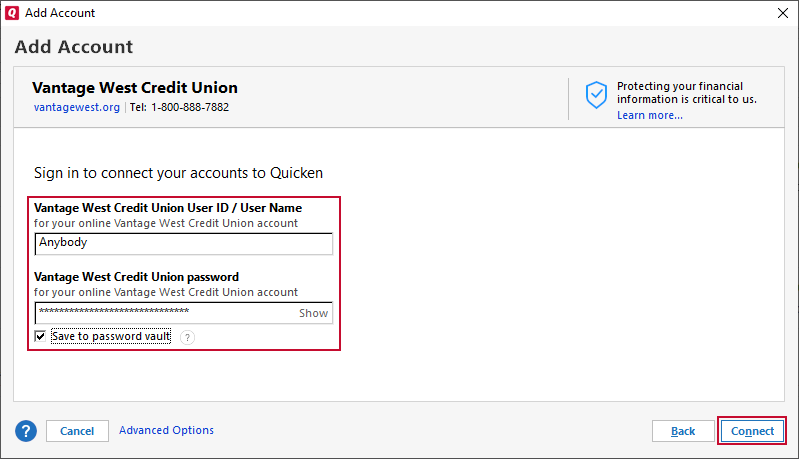
Enter your account/user information. This is the information you use to sign in to your online account, such as a user name and password. you may be asked for additional information, such as a challenge question or a code that is sent to your email or phone.
-
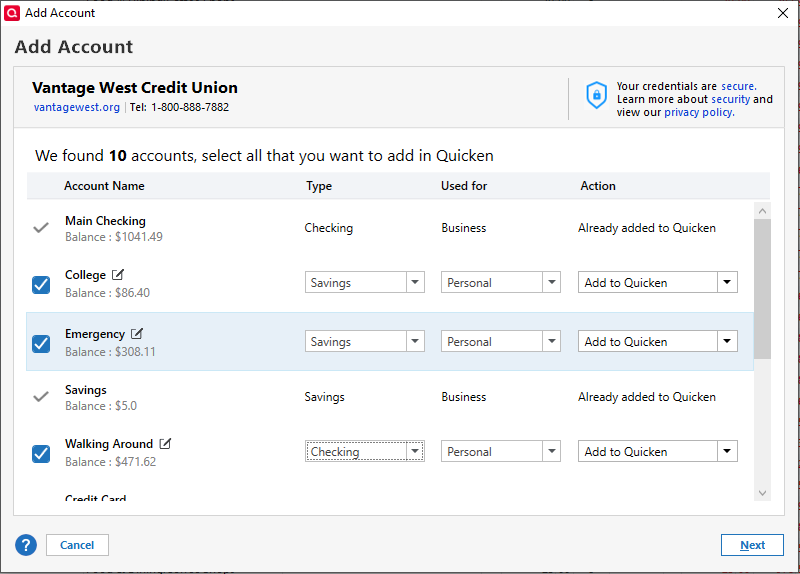
Review your accounts. Quicken finds the accounts associated with your login. On this screen, review the list, make any needed changes, and then click Next.
-
Account name: Click the edit icon and enter a name that helps you identify the account.
-
Type: Your options vary by financial institution, but Checking and Savings are common.
-
Used for: You might not see/need this field. This will only appear for tiers that include Business or Rental accounts. Use Business or Rental to differentiate from Personal accounts.
-
Action: Choose Add to Quicken to add the account, Don’t add to Quicken to skip it, or Link to existing account to connect it to an account that’s already in your file.
-
-
After you sign in to your financial institution, Quicken shows a list of accounts it found so you can choose what to add and make quick adjustments before continuing.
Review your accounts
On the Add Account screen, review the list and confirm each account is set up the way you want.
-
Select the checkbox next to each account you want to add.
-
If needed, update the account settings in the row (see the details below).
-
Click Next.
Accounts already in your file show Already added to Quicken and can’t be added again.
Adjust account details
Use the columns on this screen to make changes before you continue.
Account name
This is the name Quicken will use for the account in your file.
To rename an account, click the account name (or the edit icon) and type a new name.
Type
This is the account type Quicken will create.
Your options vary by financial institution, but Checking and Savings are common.
Used for
This sets how the account is categorized in Quicken.
Most accounts are Personal. Depending on your Quicken version, you might also see Business and Rental.
Action
This controls what Quicken does with the account.
-
Add to Quicken: Adds the account as a new account in your file.
-
Don’t add to Quicken: Skips the account.
-
Link to existing account: Links the downloaded account to an account that’s already in your file.
-
Quicken now adds your accounts. You'll see a message letting you know what accounts were added. You can choose to either Add Another Account or Finish.
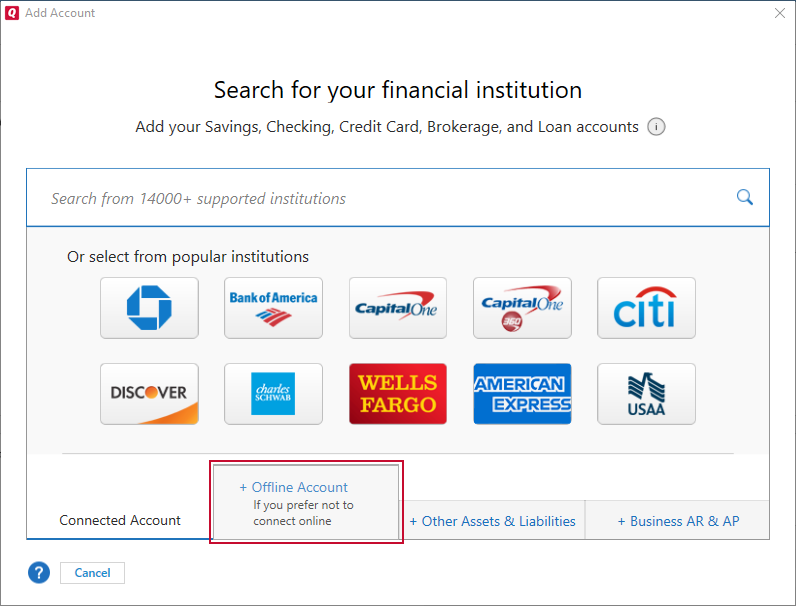
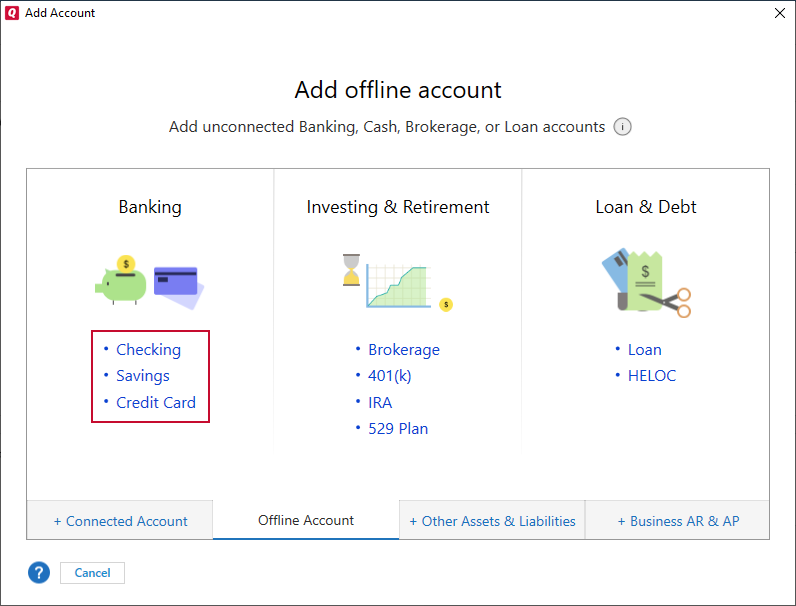
Add an offline account
Offline accounts (sometimes called manual accounts) don't connect to a financial institution. It is your responsibility to enter all the information and track your transactions accurately. In most cases, it is preferable to use an online account, but you may choose this for security, control, or because the account is not with an institution Quicken can connect to.
-
Select the Add Account
You can also add a new account by selecting Tools → Add Account from the top menu.
-
Select Offline Account.
-
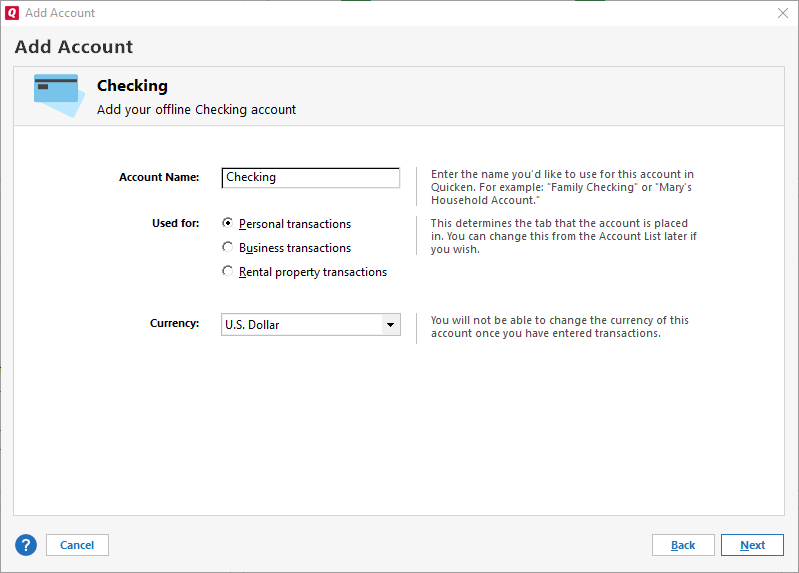
Select the account type. Spending accounts include Checking, Savings, and Credit Card.
-
Name your account and select Next. Depending on your version of Quicken, you may also have options for selecting how your account is used.
-
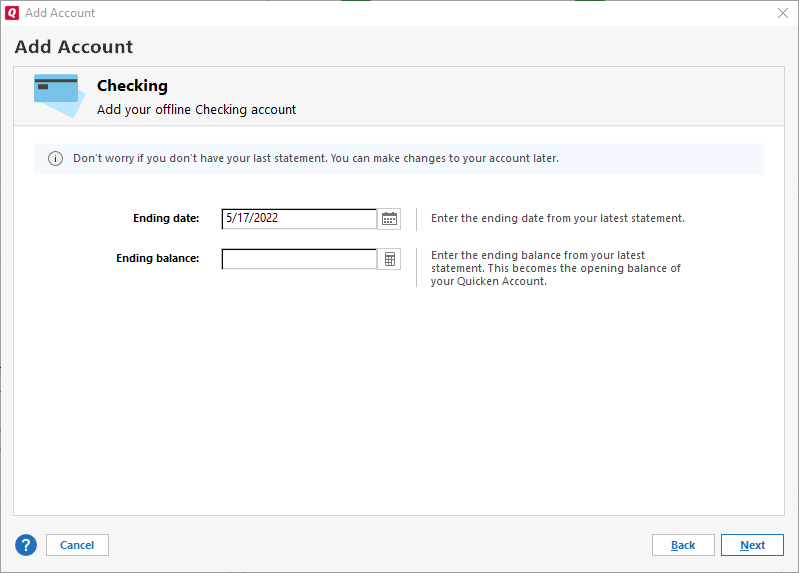
Enter your Statement ending date (The date you want to start tracking from) and your Statement ending balance (how much was in your account that day). Select Next.
-
Your account will be added. Select Finish. You can also choose to Add Another Account.
More Information
-
Types of accounts -
Edit the opening balance of an account -
Tell us about this account -
Enter your account information -
Enter the ending date and balance from your statement -
Add a cash account for Merchant Account Services -
Add a liability account -
Add an asset account -
Add rental property accounts -
Add a home equity line of credit (HELOC) account
Explore the Home tab
The Home tab is the central hub for using Quicken. It allows you to view your key financial information at a glance on the Dashboard. You can also add one or more views that can be customized to suit your needs. Below is information about what you can find on your Home tab and tips for customization.
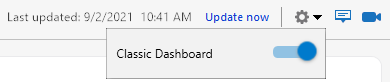
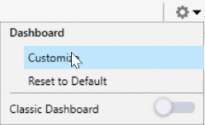
You have a choice between our newer, Modern Dashboard and the Classic Dashboard.
The Modern Dashboard allows you to change the order of your financial cards such as Top Spending Categories, Top Payees, Recent Transactions, Uncategorized, Investment Top Movers, and Portfolio Value. It also offers newer interface tools and is the dashboard we will continue to update and refine going forward.
To switch between the Modern Dashboard and the Classic Dashboard, use the gear icon at the top of the Dashboard.
Using the Classic Dashboard
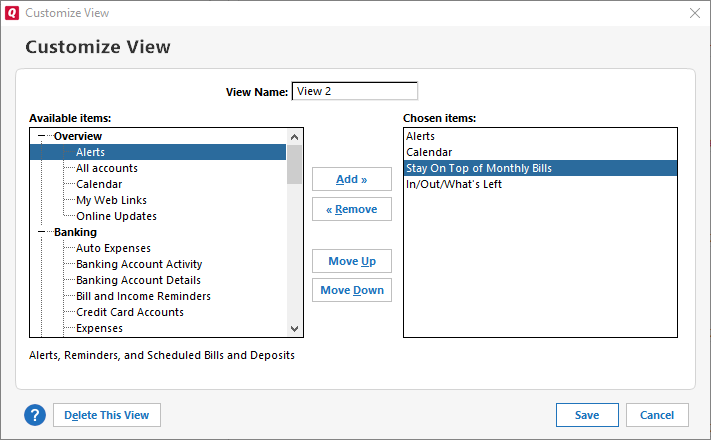
To add items to the Main View or to a custom view of the Home tab
-
Click the Home tab.
-
On the top of the page, click the required view name.
-
Click the Gear icon

-
Select Customize View.
-
From the Available Items list, select the items to add to the selected view. (If necessary, click the plus sign next to a heading in the Available Items to display the list of items under that heading.)
-
Click the Add button.
-
Click Save.
To remove and rearrange items in a view
-
Click the Home tab.
-
On the top of the page, click the required view name.
-
Click the Gear icon
-
Select Customize View.
-
From the Available items list on the right side of the Customize View dialog, select an item to move or delete.
-
To remove the item, click the Remove button.
-
To reposition the item, click the Move Up or Move Down button until the item is in the desired position.
-
-
Click Save.
To expand or collapse items in a view
You can expand or collapse the items in a view. Simply click the expand (plus) icon or collapse (minus) icon on the upper left side of the item panel.
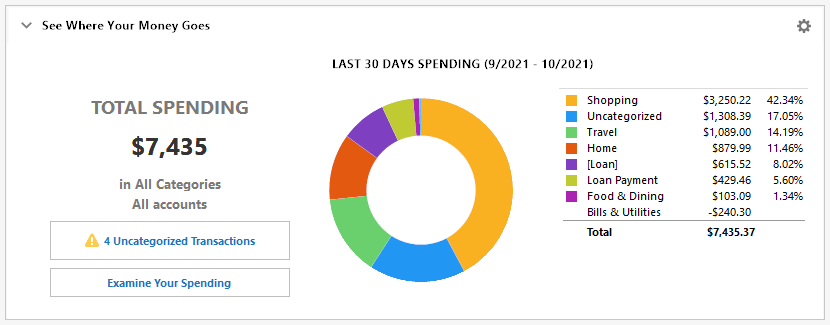
See Where Your Money Goes
This section shows you how much of your money is being spent on each of your spending categories.
To change the date range or the accounts included in the graph, click Options in the upper right of the section.
Only spending accounts can be selected for display. For most users, their checking account is their spending account. To see which of your accounts are spending accounts, choose Tools menu > Account List > Personal Banking. The accounts listed under the Spending header are your spending accounts.
Double-clicking the pie chart, any category name, or Examine Your Spending opens the Spending tab where you can review each transaction included in the pie chart and recategorize them if they are in the wrong bucket.
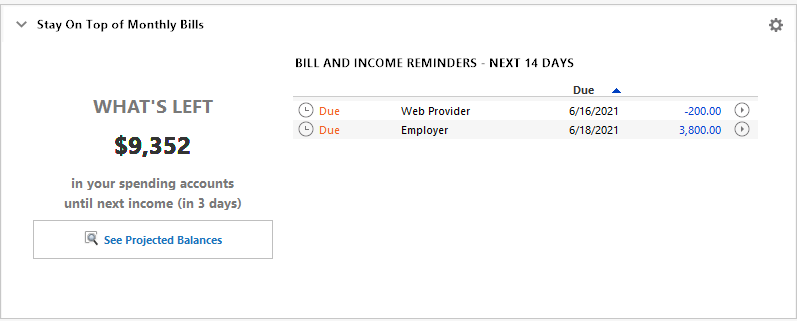
Stay on Top of Monthly Bills
This section shows you how much money you have coming in and going out, so you can pay bills on time and avoid late payments and overdraft charges.
The list includes all upcoming bill reminders and scheduled income for the specified date range.
To change the time period, or to add a new reminder, click Options in the upper right of the section.
Any bill or income reminders that fall within the specified date range are displayed here.
The What's Left section displays the total amount of unallocated funds you have in your spending accounts at the end of the specified time range.
You will also see a Risk of Overdraft or a Projected Balances button, depending on your account balances. Clicking either button displays the Projected Balances graph, which shows your spending account balances over time, based on the planned spending and income you have told Quicken about.
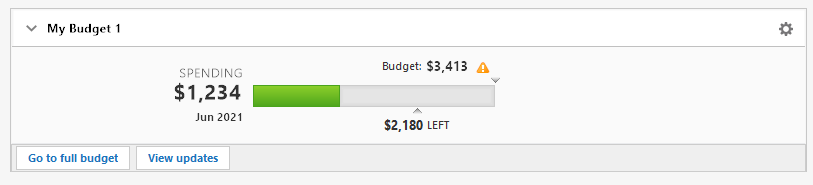
Budget Your Spending
This section shows you how you're doing against your budget. The card displays a summary graph of your total spending for the month. If you want more detail, click on the graph to see how much you are over or under budget, or click Options in the upper right of the section to add categories to the card or go to your full budget.
Using the Modern Dashboard
The Modern Dashboard has cards that display different aspects of your finances. It is an excellent place to start each time you use Quicken.
Hiding a card
To hide a card, click the three-dot menu ![]()
You can also go to the gear menu and select Customize.
You will see a list of the cards and can turn any of them off or on by clicking the display toggle.
Available Cards
The first time you come to the Home tab, if you have not added any data (set up your accounts), these cards will be blank. Select Get Started in each section to go through the setup process for that section. Once you’ve done this, the buttons go away, and you can simply use the Home tab to track your financial picture.
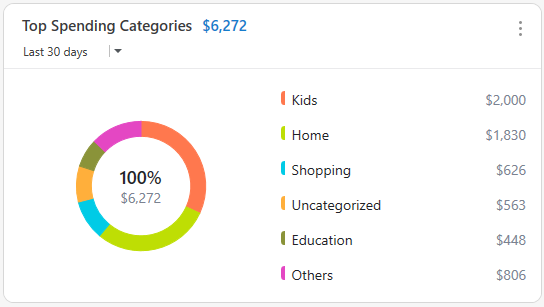
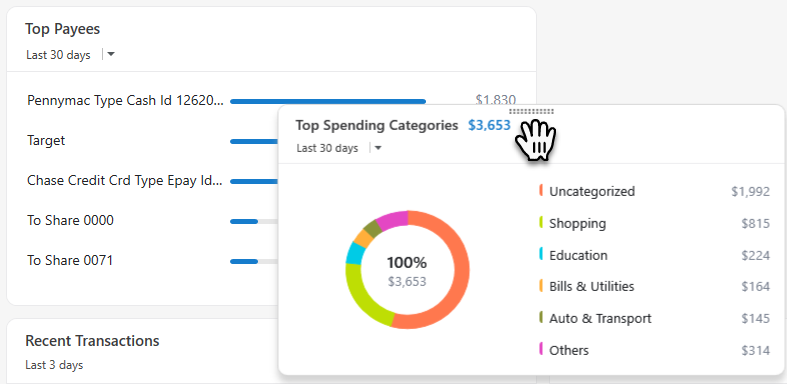
Top Spending Categories
The Top Spending Categories card shows what categories you are spending your money in. The default view is for the Last 30 days, but you can choose other time periods as well. You can hover your pointer over any category to see more information about your spending in that category. You can click a category to see the transactions associated with that category.
Click the three-dot menu ![]()
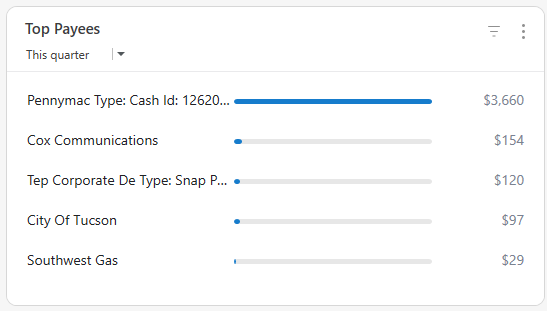
Top Payees
The Top Payees card shows you the payees that have received the most money. You can adjust the date range to get a better idea of your spending over time. You can also hover your pointer over a payee to see how much money you have sent them, and what percentage of your total spending was given to that payee. Click a payee to see a spending report for that payee.
Click the three-dot menu ![]()
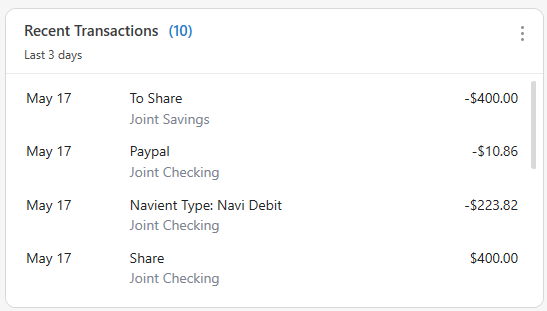
Recent Transactions
The Recent Transactions card shows you what transactions you've made in the last three days. If you have many transactions, you can scroll through them on the card. You can also hover your pointer over a transaction to get more details about the Account and Category. You can click a transaction to see that transaction in your register.
Click the three-dot menu ![]()
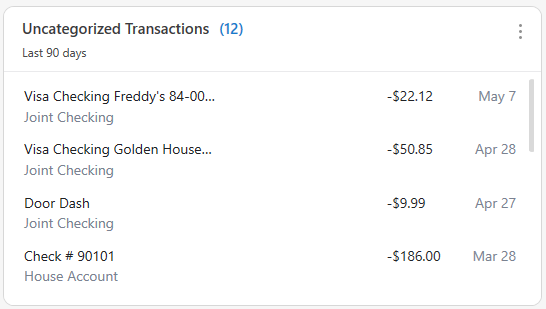
Uncategorized
The Uncategorized card is an excellent resource that you can use to assign categories to your transactions. You can click any transaction to review it on a list of your uncategorized transactions.
Click the three-dot menu ![]()
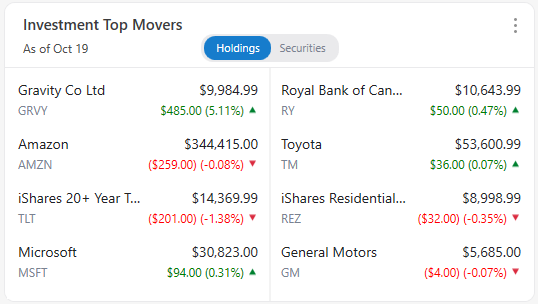
Investment Top Movers
If you are using Quicken to track investments, the Investment Top Movers card will show the investments with the highest percentage change, either up or down. It will show the information for the day of your most recent update, listing the date on the card. During trading hours, the information will reflect a fifteen-minute reporting delay. You can also choose to view top movers in all of your holdings or only in securities.
Click the three-dot menu ![]()
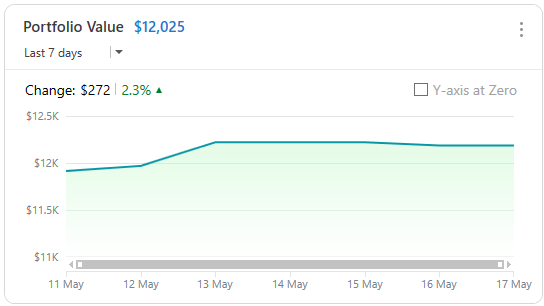
Portfolio Value
The Portfolio Value card shows the total worth of your investment holdings and tracks the change in value. You can choose from several different time periods. Turning off Y-axis at Zero will focus on the value changes rather than the total portfolio value.
Click the three-dot menu ![]()
How do I customize a view on the Home tab?
You can create multiple views on the Home tab; add, delete, or rearrange the components that each displays. You can add up to a total of 40 snapshots, depending on your version of Quicken—so that each contains only the Quicken data that is most important to you.
Quicken lets you create a total of 11 views to track different financial areas.
To add a custom view to the Home tab
-
Click the Home tab.
-
Click Add View.
-
Enter a name for the view.
-
Add any items that you want this view to display.
-
Click OK.
To arrange items to the Main View or to a custom view of the Home tab
-
Hover your pointer over the center top of an individual card. You should see a double row of dots.
-
Drag the card to where you want it to be located. The card will replace the one currently there, and the other cards will be rearranged to reflect the new order.
To navigate between views on the Home tab
-
Click the Home tab.
-
On the top of the page, click the required view name.
To delete a view
-
Click the Home tab.
-
On the top of the page, click the required view name.
-
Click Customize.
-
Click Delete This View.
You can't delete the Main View unless you have created at least one other view.
Why am I seeing this page / window?
This help page is often the first help page people see because it is associated with the Home screen and Dashboard, one of our most commonly used features. You can access help from any screen in Quicken by pressing the F1 key ![]()
![]()
Do you need to contact support?
You can contact support here.
Note for our Canadian Customers
The following terms will be different in the Canadian releases of Quicken.
Canada: "Cheque" / United States: "Check"
Canada: "Colour" / United States: "Color"
Canada: "Centre" / United States: "Center"
Canada: "Realise" / United States: "Realize"
Canada: "Behaviour" / United States: "Behavior"
Canada: "Analyse" / United States: "Analyze"
Review your spending
Troubleshooting
Are you having issues with your transactions? Please visit our support site.
Use the Spending tab to see a breakdown of where your money is going. The pie chart provides a way to drill down and see the transactions in a particular category. You can also see which transactions are uncategorized, so you can easily assign them to categories.

See where your money is going
-
Click the Spending tab.
-
Use the filters at the top of the window to change the accounts, time period, and type of transactions (spending, income, or spending without taxes) that you want to see.

-
Click a slice in the pie chart to see the transactions in a particular category. You can also click any of the items in the legend. The list of transactions below the pie chart changes to show only the transactions in that category. Using the list you can easily change the categories and payees assigned to your transactions.
-
If transactions are assigned to the wrong category
If any transactions are incorrectly categorized, click a transaction in the list below the pie chart and select the correct category.
-
If transactions are assigned to the wrong payee
If transactions are assigned to the wrong payee, click a transaction in the list below the pie chart and select the correct payee.
-
To navigate back up
To navigate back up, click the "breadcrumb" links in the upper left of the pie chart window.
-
-
Continue to click a slice in the pie chart or legend to see the transactions paid to a particular payee.
Note
If there are any uncategorized transactions, a message appears with a link that will take you to a list of the uncategorized transactions.
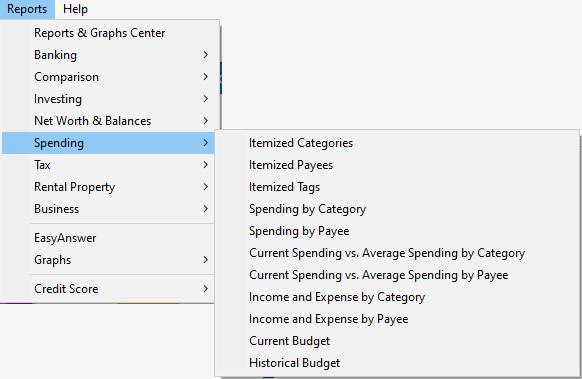
Reports
For more spending data you may want to try our reports.
Go to the Reports menu → Spending for a list of spending reports.
For more information