Downloading transactions
Downloading your data is the most convenient way to get your transactions and other account information from your bank, credit card company, and other financial institutions into Quicken. Instead of entering each transaction manually, you can set up your accounts for automatic download directly into Quicken. To set up your online accounts, see Setting up accounts.
Download transactions for all accounts at once (Update Accounts)
You can update your accounts two different ways:
Click the Update Accounts icon at the top of the sidebar. You can see when the accounts were last updated immediately below the update button.

Choose Accounts > Update All Online Accounts from the Quicken menu.
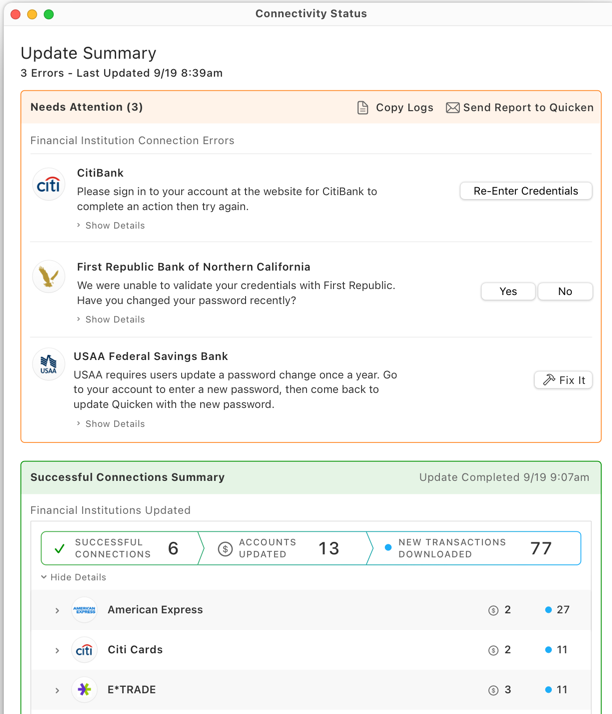
When your update is complete, you will see a Connectivity Status window. That window will let you know what accounts connected successfully. You may also see a Needs Attention panel that will inform you of any connectivity issues and suggest a resolution, such as Re-Enter Credentials. You can recall the Connectivity Status window by going to the menu bar at the top of the screen and selecting Window > Connectivity Status.
You can copy the Update Summary information. This can be helpful if you're experiencing an issue and want to preserve the update text.

Identify New or Unreviewed Transaction
The Status column in the register allows you to identify recently entered and Bill Pay transactions.
Set the Status filter in your register's filter bar to Last Downloaded to see only transactions that were downloaded during the last update.
Set the Status filter in your register's filter bar to Not Reviewed to see downloaded transactions that you have not yet reviewed. Reviewing a transaction is optional.
Learn more about the transaction download status icons displayed in your account register.
Match downloaded transactions
Automatic Matching of Manually Entered Transactions
You can manually enter transactions even in your accounts that are set up for automatic download. When Quicken downloads from your bank account a transaction that matches the date and amount of a manually entered transaction, the downloaded transaction will match the manual transaction, resulting in only one transaction in your account register. Any manually entered payee name, category, memos, or tags will be retained. Matched transactions are represented by the icon ![]() .
.
If Quicken fails to recognize that a downloaded transaction matches a manually entered transaction, you can match them manually by dragging and dropping one onto the other.
Automatic Matching of Scheduled Transactions
Scheduled Transactions are marked as paid automatically when you download a transaction from your bank that matches a scheduled transaction in your register.
For example, suppose you have a scheduled transaction for your electricity bill. You schedule it to be paid on the first Friday of every month. Then, later, you pay that bill at your bank's website. When Quicken downloads a transaction from your bank account that consists of a payment to your electricity company around the beginning of the month with the same amount as the scheduled transaction, it automatically marks the scheduled transaction for your electricity bill for that month as paid.
If Quicken fails to recognize that a downloaded transaction matches a scheduled transaction, you can match them manually by dragging and dropping one onto the other. Matched transactions are represented by the icon ![]() .
.
Importing Transactions
When you set up an online account and download transactions, you will only see a limited number of transactions, usually the last 90 days of transactions. This is a limit set by banks. This is one reason why you should regularly download transactions from your bank. You do not want to update so rarely that there are gaps in your transactions.
It is possible to import transactions from further back than 90 days, but you will have to export those transactions from your financial account's website.
Importing files from your bank
What is QFX?
QFX stands for Quicken File eXchange. It is used by many financial institution websites to transfer information from their website to Quicken. QFX files provide information about transactions, balances, and other key data that needs to be passed from the financial institution to Quicken. Using QFX files to transfer information is often referred to by Quicken as Web Connect or Quicken WebConnect.
QXF (Web Connect) is primarily used to transfer financial information when Direct Connect and Express Web Connect are unsupported by the financial institution. If you have the option to use Direct Connect or Express Web Connect, we recommend that you chose one of those options instead.
QXF (Web Connect) is also sometimes used to download older transactions from a financial institution when you want to view those transactions in your Quicken file.
Downloading a QFX file from your financial institution's website
One of the reasons QFX is not the preferred option for most users is that you must download the file directly from your financial institution's website. While we can provide general instructions, websites vary.
Log in to your financial institution's website.
Select the account you wish to download transactions for. The download option is usually on the transactions page for an account.
Select the download link. This is usually represented by a download symbol using a down arrow such as
 .
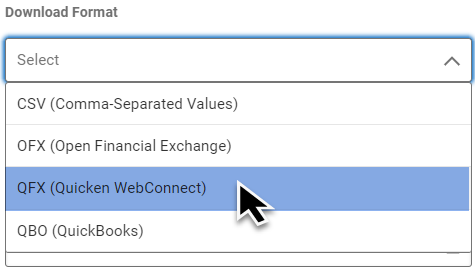
.You may need to select the download format. Look for the format QFX or Web Connect.

You will have to specify the Date Range (Start Date / End Date). You may also need to select the account or accounts you wish to download.
Once you have filled out all of your information, there should be a button to select, such as Download or Export or Start to start downloading the transaction.
The transaction will download into the default directory/folder for your browser. This is usually the Downloads directory.
If you have existing transactions in Quicken for your financial account, make sure that you do not duplicate those dates, otherwise you will have duplicate transaction. You can always delete duplicate transactions, but it it much easier to just avoid duplicating dates.
Importing a QFX file into Quicken
Once you have downloaded your QFX file, you'll need to import that file into Quicken. If this file was requested as part of a process, such as the Download Transactions screen, follow the instructions there. Otherwise follow the instructions below:
Back up your Quicken Data File.
Go to the File menu and select Import → Bank or Brokerage File (OFX, QFX).
The file selection screen will appear.Use the Browse button to find and select the file you want to import.
Click Open or double-click the file to import.
The Choose Your Accounts screen will appear. Select the account you want to import transactions to.
Review the account register to verify the transactions have been added.
For more information about downloading transactions, including troubleshooting information, see the support article How do I import/export a Quicken Transfer Format (.QXF) file?.
