Exporting data from Quicken
You can export and copy your Quicken data to other programs. For example, from one Quicken account (or file) to another, or to Microsoft Word or Excel.
Export report data to an Excel file
Choose Reports menu > Reports & Graphs Center.
Select the report you want to export.
Click Show Report.
Click Export.
Where is the Export button?
Quicken displays the Export button only for reports, not graphs. You can find it at the top of your report screen.

Choose Export to Excel Worksheet.
In the File name field, enter a name for the file and click Save.
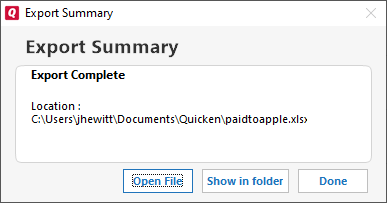
The Export Summary screen will appear with information about where your report was saved.Quicken stores the file in the Quicken folder by default

Switch to Excel.
Use Excel's Open command, and navigate to the file containing your report data.
Where does Quicken put the Excel file?
Quicken stores the file in the Quicken folder by default.
Export financial data to a QXF file
To learn more, see Export to QXF.
Export financial data to a QIF file
QIF (Quicken Interchange Format) is a legacy file format that is used to transfer financial data between websites and applications. QIF is being replaced over time by new QXF (Quicken Transfer Format) file format. Unless you need to transfer investment or business data, we recommend that you skip the steps below and use QXF export instead. To learn more, see Export to QXF. Otherwise, here is how to export to QIF:
Choose File menu > File Export > QIF file.
In the QIF File to Export to field, Quicken displays the preset path of the export file. Select the appropriate option:
Enter a name for the export file at the end of the existing path (make sure there is a backslash \ before the file name). Quicken automatically adds the correct file extension.
Click Browse to select a different location. Enter a name in the File name field, and then click OK to return to the QIF Export screen.
In the Quicken Account to Export from list, select the account from which to export transactions.
What if I only want to export lists?
If you're exporting data only from lists and not exporting transactions, it doesn't matter which account you select here.
In the Include Transactions in Dates field, enter the dates of transactions to export.
To export only those transactions that occurred during a specific interval of time, enter the beginning and ending dates of that time interval.
To export all transactions, enter the dates of the first and last transactions in your register or transaction list.
In the Include in Export list, select the items to include in the export.
Select Transactions to include the data in the account's register or transaction list.
Select Account List to include all your accounts.
Select Category List to include the Tag List in addition to your list of categories.
Select Memorized payees to make available from QuickFill and the Memorized Payee List all the transactions you had Quicken memorize in the previous file.
Select Security Lists to include all your securities, security prices (including price histories), security types, and your investment goals.
Select For Macintosh Users to includes securities, security prices, and the last-saved budget so you can import them to a Quicken for Macintosh file.
Select Business Lists to include invoice items and all templates (only in Quicken Business & Personal).
Click OK to create the .QIF file.
Import the QIF file into Quicken.
Notes
To set up a new file with your existing lists, use Export and Import to copy everything except the transactions from an existing file. After copying the list information, you can make changes to the lists at any time.
Export financial data to a tax program
Information is available at Export tax data to a tax program.
Copy transactions to another program
Open the account you want to copy transactions from and go to its register. Note: This feature works only with non-investment accounts.
In the register, select the transaction(s) you want to copy.
Choose Edit menu > Transaction > Copy transaction(s). The register columns that are copied are the ones that are displayed.
Switch to the program you want to copy the transaction(s) into.
Position the cursor where you want the transactions pasted.
Use the program's Paste command (usually, it's on the Edit menu).
Copy a report to another program
Display the report you want.
Click Export.
Where is the Export button?
Quicken displays the Export button only for reports, not graphs. You can find it at the top of your report screen.

Choose Copy to Clipboard.
Switch to your word processing or spreadsheet program.
Position the cursor where you want the data pasted.
Use the program's Paste command (usually, it's on the Edit menu).
Tell me more about pasting my data
If you pasted to a word processing program, you may need to set each tab to accommodate the data in each column. To display all the columns on one page, you may need to change to a smaller font size.
If this doesn't work, try printing the report to an ASCII file from Quicken. When you open the ASCII file in your word processing program, the report columns are separated by spaces.
If you pasted to a spreadsheet program, resize the columns as necessary to display the data.
Print a report to a PDF file
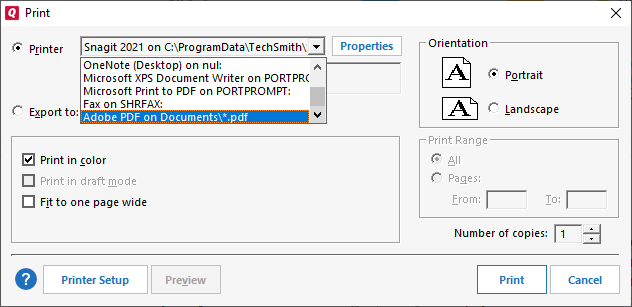
You can print reports in Quicken simply by pressing CTRL + P or by looking at your print options on the File menu. If you want to create a PDF, select Adobe PDF from the printer option in your print dialog. (See image)

Note for our Canadian Customers
The following terms will be different in the Canadian releases of Quicken.
Canada: "Cheque" / United States: "Check"
Canada: "Colour" / United States: "Color"
Canada: "Centre" / United States: "Center"
Canada: "Realise" / United States: "Realize"
Canada: "Behaviour" / United States: "Behavior"
Canada: "Analyse" / United States: "Analyze"
