
Are you having issues with your register or accounts?
See Troubleshoot account register issues, or contact support directly.
The Quicken register records all your financial transactions, much like a traditional checkbook register. It includes checks, deposits, and electronic transactions, which you can enter manually or download from your bank.
The register tracks all financial activity in an account, showing each transaction by date, payee, category, and amount. Recording transactions in the register keeps your records complete and makes it easier to reconcile your accounts against your bank's records.
Elements of the register
The register provides a detailed record of every transaction in an account. These columns appear by default.
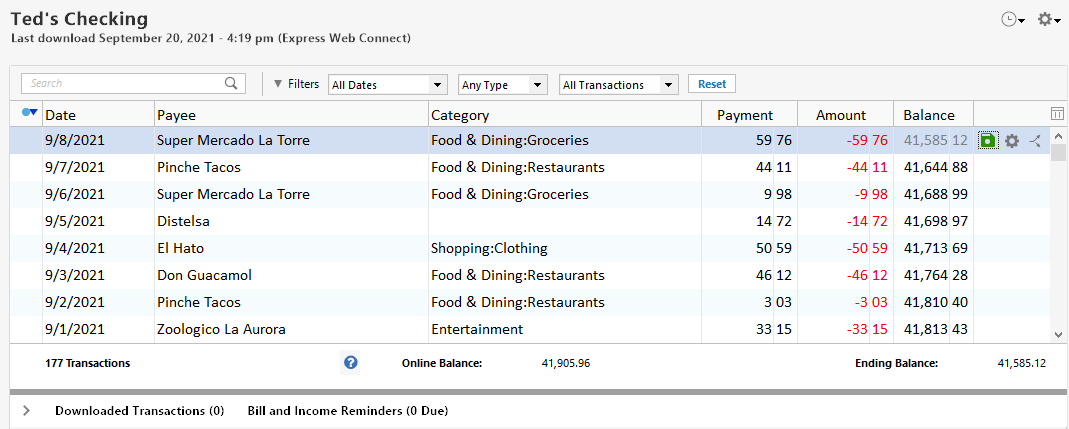
-
Status shows the state of the transaction, such as a newly downloaded or pending entry.
-
Flags mark transactions for easy identification or to highlight them for further action.
-
Date records the date of each transaction and orders the register chronologically.
-
Check # records the check number, if the transaction involves a check.
-
Payee shows the person or entity that received the payment or made the deposit.
-
Memo holds optional notes about the transaction, such as the purpose of a payment or details from a receipt.
-
Category classifies the transaction for budgeting and reporting, using categories such as Entertainment, Home, or Shopping.
-
Tag adds a second layer of organization alongside categories, useful for tracking project expenses or separating personal and business spending.
-
Attachments holds documents related to the transaction, such as receipts, invoices, or warranties.
-
Payment shows the amount paid out.
-
Cleared, labeled Clr in the register, shows whether the transaction has cleared or been reconciled with your bank.
-
Deposit shows the amount received.
-
Amount combines payments and deposits into a single figure.
-
Balance shows the running account total after each transaction.
-
Action buttons shows the buttons for saving, editing, and acting on the selected transaction. This is always the last column.
Change the columns that display in the register
-
Display the register you want to change.
-
Click the column icon at the right end of the column header row.
-
Select the columns you want to display, and clear the ones you want to hide.
-
Click Done.
To change the order of the columns, select a column in the list and click Up or Down to move it. Action buttons is always the last column and can't be moved.
Notes:
-
This feature is available in non-investment registers only.
-
Each non-investment register can have its own column settings.
-
The columns available depend on the account type and on whether the register uses one-line or two-line display.
-
Some columns, such as Date, are required and can't be cleared.
For more detail, see changing the columns that display in a register.
Additional columns
Beyond the defaults, the column list includes options for tax tracking, business use, and downloaded transaction detail. Some of the more useful ones:
-
Tax-related marks a transaction as tax related, which helps with tax preparation and reporting.
-
Tax Line Item shows the tax form line the transaction's category maps to.
-
Notes holds additional notes that don't fit in the memo field.
-
Expensed tracks whether a transaction has been expensed in reports.
The list also includes a set of Downloaded columns, such as Downloaded payee and Downloaded amount, which show the original values your bank sent before any changes you made.