
You can edit a memorized payee to update transaction details, add or remove rules, or lock values you want to keep unchanged. This helps you control how Quicken fills in fields for both new and downloaded transactions.
Open the Memorized Payee List
-
Go to Tools > Memorized Payee List.
-
Select the payee you want to change.
-
Click Edit.
Update payee details
In the edit window, you can change:
-
Payee name
-
Category, tag, or memo
-
Transaction type
-
Address or amount
-
Cleared status
-
Lock status to prevent changes to blank or prefilled fields
Add or modify rule conditions (optional)
You can set conditions that automatically assign a category, tag, memo, or other detail to a transaction whenever it matches the payee. Quicken checks these conditions in order: account-based rules first, then amount-based rules, then general rules. If two rules share the same priority, Quicken uses whichever one was applied most recently.
Add a condition
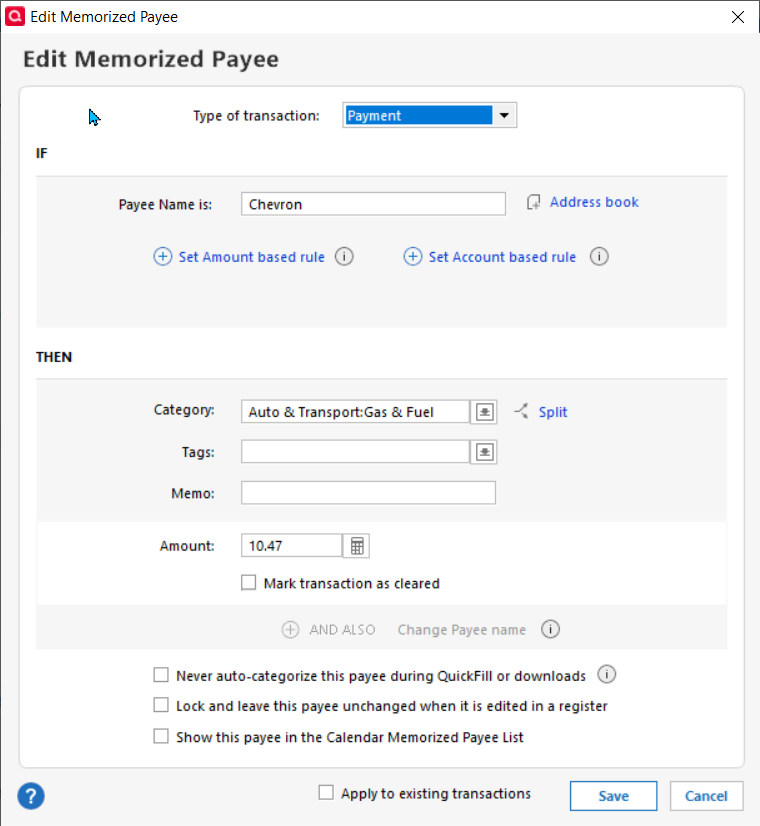
Follow these steps to add a rule condition to a memorized payee.
-
In the edit window, under IF, click Set Amount based rule to add an amount condition, Set Account based rule to add an account condition, or both to combine them.
-
If you added an amount condition, choose a comparison from the dropdown (for example, is or is less than) and enter the amount. Adding an amount condition disables the flat Amount field under THEN, since the amount now depends on the condition instead of being fixed.
-
If you added an account condition, choose the account.
-
Under THEN, enter the category, tag, memo, or other detail you want Quicken to apply when the condition matches.
-
Click Save.
Amount-based rules
An amount-based rule applies its details only when a transaction's amount matches a specific value or range. Use this when the same payee charges different amounts for different purposes.
Examples:
-
Amount = $29.99 → Category: Subscriptions
-
Amount less than $10.99 → Category: Gaming
-
Amount between $20 and $40 → Category: Groceries
Account-based rules
An account-based rule applies its details based on which account the transaction comes from. Use this when you want the same payee to fall into different categories depending on the account you use.
Examples:
-
Account = Amex Card → Category: Gas & Fuel
-
Account = Chase Visa → Category: Groceries
Amount + account rules
You can combine an amount condition and an account condition on the same rule for more precision.
Example:
-
Amount = $29.99, Account = Citi Card → Category: Streaming Services
Example of priority in action: Suppose you have a rule for Amazon + Amex that sets the category to Home Improvements, and another rule for Amazon + amount over $200 that sets the category to Electronics. A $250 Amazon purchase on your Amex card uses the Home Improvements rule, because account-based rules are checked before amount-based rules.
Rename payee based on rule conditions
You can set rules that change the payee name in your register depending on the amount or account.
Examples:
-
Payee: Pharmacy, Amount > $100 → Rename to: Safeway Pharmacy
-
Payee: Apple, Amount = $29.99 → Rename to: Apple One Subscription
This renaming only affects how the transaction appears in your register; it does not create a new renaming rule.
Note: To create a global rename rule that applies to all downloaded transactions from a specific payee, go to Edit > Preferences > Renaming Rules. This is different from conditional renaming, which only applies when specific amount or account conditions are met.
Apply rules to existing transactions
You can apply a rule to transactions already in your register, not just new ones going forward.
-
In the edit window, near the bottom, select Apply to existing transactions, then click Save.
-
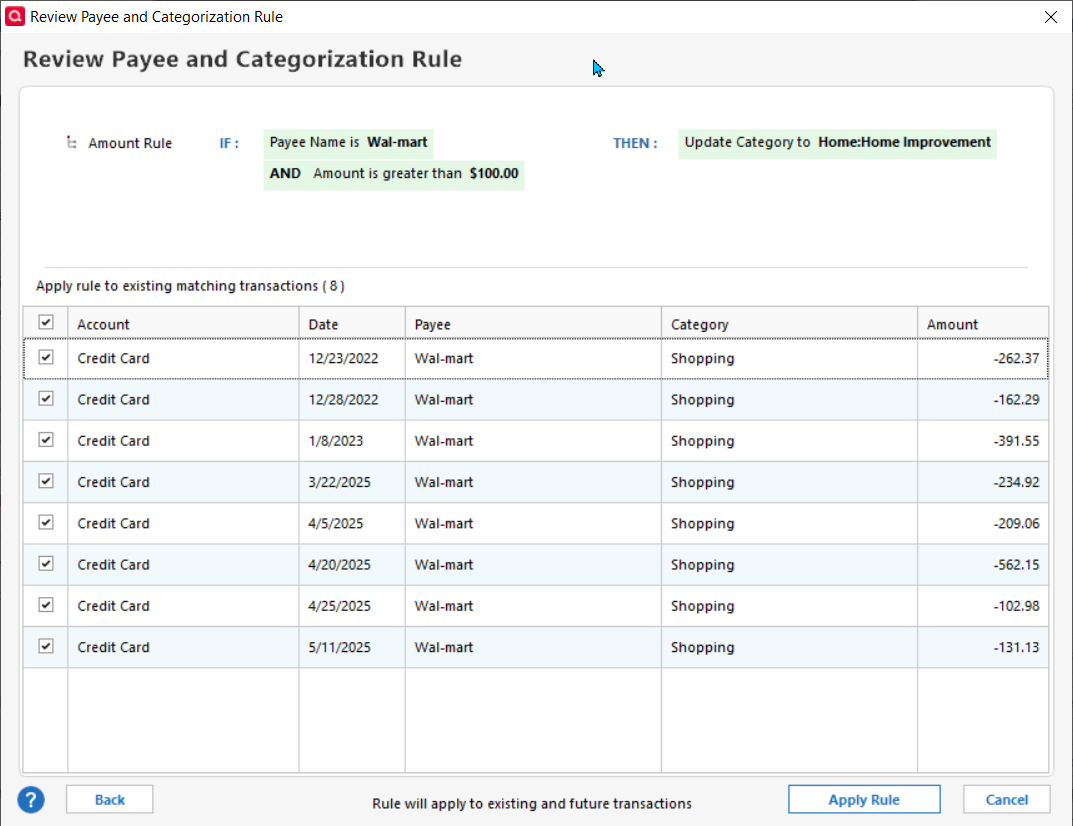
Quicken opens the Review Payee and Categorization Rule window and lists the transactions that match the rule.
-
Clear the checkbox next to any transaction you don't want the rule applied to.
-
Click Apply Rule.
The rule applies to the transactions you left checked, and to any new matching transactions going forward.
Use Lock to prevent changes
To stop Quicken from changing a memorized payee's fields, check Lock and leave unchanged. This keeps any blank fields untouched and preserves manually entered information.