Adding a loan
To get started, you can add a loan manually or download the data from your financial institution. The setup is identical to adding your other account details, such as your banking and savings account information.
You can either click on the + button at the top of the sidebar, or choose Accounts > Add Account from the Quicken menu. If you connect your loan, Quicken may change the type based on the information provided by your financial institution. You can also choose Offline Account to add an account that will not have an online connection.
If you add the loan manually, the defaults will be set based on the type of loan you specify.
Auto Loan
Mortgage
Other Loans
Other Liabilities
You will be asked for the following:
Account Name: This can be whatever you want to call the loan.
Loan Type: A list of different loan types. Choose the one that best represents your loan.
Primary Use: If you have a business you track in Quicken, you will be asked to choose between Business and Personal.
Once you have added the loan, you can add details, whether you added it manually or automatically.
Loan Details
Loan Type: Enter or select the type of loan from the available options (e.g., mortgage, auto, consumer).
Original Balance: Enter the total amount of the loan when it was originally taken out.
Current Balance: Enter the remaining balance of the loan as of the current date.
Loan Length: Select the duration of the loan in years, months, weeks, or payments based on your loan agreement.
Interest Rate: Enter the annual interest rate of the loan as a percentage.
First Payment Date: Enter the date when your first payment on the loan is or was due.
Maturity Date: Enter the date when the loan is scheduled to be fully repaid. You can use this or the First Payment Date to set your loan schedule.
Compounding Period: Select how often the interest is compounded.
Payment Schedule: Select how often you will make payments on the loan.
Loan Payment
Frequency: Select how often your loan payments are made.
Next Payment: Enter the date of your next scheduled loan payment.
Principal: Enter the principal amount for each payment. This amount is typically auto-calculated based on the information provided but can be entered.
Add extra principal, insurance, tax, etc.: Enter any additional amounts you wish to pay towards the principal, insurance, taxes, or other related costs. This amount is typically auto-calculated based on the information provided but can be entered.
Extra Principal: Enter any additional amount you wish to pay towards the principal balance of the loan beyond the required payment. This amount is typically auto-calculated based on the information provided but can be entered.
Total: Enter the total amount of the next payment, including principal, interest, and any extra amounts added. This amount is typically auto-calculated based on the information provided but can be entered.
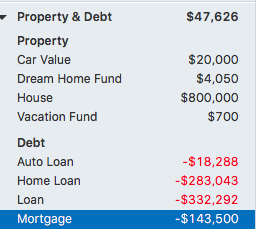
Once you have entered this information, select Continue. You will have the opportunity to select an account to make payments from and the type of reminder you would like to receive. Enter the information and select Finish. Your newly added loan appears in the Debt section of Property & Debt on your sidebar.

