Online Backup
About online backups
Quicken’s online backup service allows you to securely store backups of your Quicken data files online. While we encourage you to continue making local backups, this additional storage location helps prevent data loss in situations such as a missing/inoperable computer or other data loss situations.
Online backup features
Using online backups adds another layer of protection when using Quicken. It provides the following benefits.
Security: Backups are encrypted, helping to keep your data secure.
Accessibility: Online backups are stored online, allowing you to access them from any Mac with the current Quicken for Mac installed when using your account.
Convenience: The option to automatically back up your data when you quit Quicken ensures your latest information is always saved.
Control: The settings allow you to receive reminders if you haven't backed up in a while, ensuring regular backup maintenance.
Number of files
You can store up to ten backups for each of your Quicken files. After ten, saving a new file will delete the oldest unlocked file. You can lock a file to prevent it from being deleted. Simply go to File menu → View/Restore Backups, right-click or control-click the individual file, and select Lock Backup. You can lock up to nine files.
Turning on Online Backup after purchasing
If you cannot access Online Backup after purchasing it through your Quicken account, shut down and restart Quicken.
Accessing and reviewing online backups
You can access and review your online backups in Quicken for Mac to ensure your data is safe and available for information recovery. This process allows you to verify the details of your backups, such as the file name, backup date, and file size. Follow these steps to view your online backups:
Navigate to the File menu → View/Restore Backups.
Choose an online backup file to review the details. You can choose the individual data file (if you have more than one) by name using the menu Choose a file to view online backups.
You can review details such as the Date and Size of your backup. You can also view any Note and verify whether you have locked the file.
To add or edit a Note, right-click or control-click the individual file and select Edit Note.
To lock a backup, right-click or control-click the individual file and select Lock Backup. You can store up to ten backups of each of your files. After ten, saving a new file will delete the oldest unlocked file. You can lock up to nine files. If a file is locked, you will instead have the option to Unlock Backup.
To download a backup (store a local copy), right-click or control-click the individual file and select Download Backup.
To delete an online backup, right-click or control-click the individual file and select Delete Backup.
To restore a backup (make that backup your data file again), double-click on the file or select the file and click Restore Selected Backup. Restoring a backup will become your active data file.
You also have the option to restore a backup from your computer instead of from online. To do so, click Restore a Local Backup.
To close the window when you have finished managing your backups, click the close button (red) at the top left of the window.
Managing backup notifications and alerts
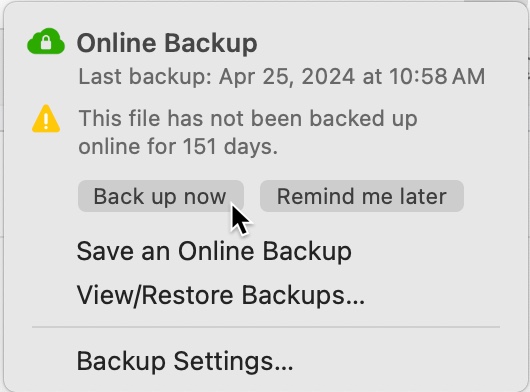
When Quicken has not performed an online backup recently, you'll see an alert![]() near the top right of your Quicken screen unless you have turned off alerts. To manage the alert:
near the top right of your Quicken screen unless you have turned off alerts. To manage the alert:
Select the backup notification menu
 to view the alert.
Select Back up now to create an immediate backup. Alternatively, you can choose Remind me later to postpone the backup notification.

If you don’t want to see alerts, you can turn off the backup icon. Select Backup Settings from the alert menu. In the Settings window, deselect Show icon in main window.
Managing your Online Backup settings
To keep your Quicken data protected, setting up your online backup settings is important. This procedure walks you through customizing how and when Quicken backs up your data online. You can adjust settings such as displaying the backup icon, automating backups upon exiting Quicken and setting reminders for backups. Here’s how you can configure these settings to fit your needs:
Select Quicken menu → Settings. You can also click on the backup notification menu
 if it is showing in your main window and select Backup settings.
Select the Backup tab at the top of the window if it has not already been selected.
Your Online Backups options are below the Local Backups options. You can:
Choose whether to show the online backup icon
 in the main window.
Choose whether to Automatically create an online backup when Quitting Quicken.
Choose whether to Ask before backing up your data file. This is helpful if you have Quicken set to make a backup when you close Quicken but may not have the time for a backup every time you close.
Set a reminder to make a backup copy and choose the time to wait before displaying a reminder (1 day, 7 days, 30 days).
Restoring from an online backup
To restore your Quicken data from an online backup:
Navigate to the File menu → View/Restore Backups.
Verify that you are looking at the correct data file. If you have more than one, you can choose the individual file (by name) using the menu Choose a file to view online backups.
In the View/Restore Backups window, select the desired backup file.
Select Restore Selected Backup.
Confirm your choice in the pop-up dialog by clicking Restore Backup.
Once Quicken has finished downloading and restoring your backup, the backed-up version of your file will automatically become your active file.
Online backup is not currently available for the Canadian version of Quicken Classic.
