Make a Check Pay payment
Check Pay is a way to automatically send payments by check through the Quicken application. Unlike our check printing feature, this service sends the actual payment. You select the account to make the payment from and the payee. Quicken sends the check using our service, Check Pay. Through our tool, you can set your payment account, add a payee, confirm the address, send a payment, and verify that the payment has been sent.
Mail a Check with Check Pay
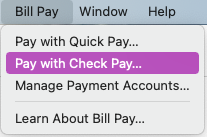
To access the Mail a Check with Check Pay screen directly go to Bill Pay menu → Pay with Check Pay. 
To send the payment:
- On the Mail a Check with Check Pay screen, complete the payment process by entering in the following information:
- Pay To: Who you are sending a check to.
- Address: How you want to designate this payee.
- Amount: This is the amount to be paid to the check recipient.
- Date: You can choose to use either a send by or arrive by date. It is good to set your Arrive by date early, in case there is an issue with the USPS.
Pay From: Which spending account you are going to use. It must be Check Pay enabled. By default, Quicken will use the account that you enabled for Check Pay. If you have more than one account, you can choose another Check Pay-enabled account.
Quicken now remembers the last account used to make payments to billers with Quick Pay or Check Pay so that you can automatically use the same account again. You are always free to choose a different account.
- Category: The spending category you wish to designate. Note: You have the option to split your Check Pay transaction, just as you would any other transaction,
- You can optionally enter information for the Tag, Memo, and Action fields. Adding this information will improve Quicken reports about your payments and transactions.
- Click Review.
- Review the payment information on the screen to ensure the Payee, the Address, the Amount, and the Pay from account are correct.
- Once you have verified the payment information, select Submit.
